Installation Guide
Welcome to the Akafuino L installation guide.
This guide will show you how to set up the Arduino IDE for usage with the Akafuino L microcontroller board. Installation differes depending on the following factors:
- Your OS
- Whether or not you already have the Arduino IDE installed on your system
Select your OS:
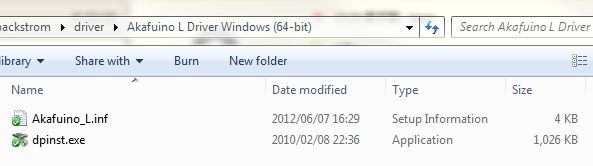
Windows: Driver installation
On Windows, an inf file driver must be installed before the Akafuino L can be used.
Click here to download the Akafuino L driver (32-bit)
Click here to download the Akafuino L driver (64-bit)
Unzip the file into a temporary directory of your choice, and run the dpinst.exe file.
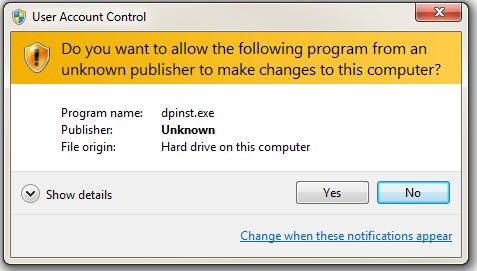
When prompted, answer Yes to allow the installation program to install the driver on your computer.
During installation, you will see this dialog box:

Make sure to select "Install this driver software anyway"
Installation can take a few minutes, so please wait patiently. Once it completes, it is time to set up the Arduino IDE.
Windows: Running the Arduino IDE
Plug in your Akafuino L to a free USB port on your computer. You will need a USB mini-b cable for this (not included). At this point, the Akafuino L will be assigned a serial port on your computer.
Now, start the Arduino IDE:
In File -> Examples -> Simple, select blink (the blink example sketch will open)
In Edit -> Boards, select Akafuino L In Edit -> Ports, select the serial port that was assigned to your Akafuino L. (It will look like this COMx, where x is a number)
Press the Upload button. After a little while, you should see the two LEDs marked TX and RX on the Akafuino L light up. Once they stop blinking and you see "Upload Successful" in the Arduino IDE, you should see the LED marked L start blinking.
OS X: Arduino IDE Setup
See Arduino Installation Guide.
OS X: Running the Arduino IDE
Plug in your Akafuino L to a free USB port on your computer. You will need a USB mini-b cable for this (not included). At this point, the Akafuino L will be assigned a serial port on your computer.
Now, start the Arduino IDE:
In File -> Examples -> Simple, select blink (the blink example sketch will open)
In Edit -> Boards, select Akafuino L In Edit -> Ports, select the serial port that was assigned to your Akafuino L. (It will look like this /dev/tty.usbserial-XXX, where XXX is an id.)
Press the Upload button. After a little while, you should see the two LEDs marked TX and RX on the Akafuino L light up. Once they stop blinking and you see "Upload Successful" in the Arduino IDE, you should see the LED marked L start blinking.
Linux: Arduino IDE Setup
See Arduino Installation Guide.
Linux: Running the Arduino IDE
Plug in your Akafuino L to a free USB port on your computer. You will need a USB mini-b cable for this (not included). At this point, the Akafuino L will be assigned a serial port on your computer.
Now, start the Arduino IDE:
In File -> Examples -> Simple, select blink (the blink example sketch will open)
In Edit -> Boards, select Akafuino L In Edit -> Serial Port, select the serial port that was assigned to your Akafuino L. (It will look like this /dev/tty.usbserial-XXX, where XXX is an id.)
Press the Upload button. After a little while, you should see the two LEDs marked TX and RX on the Akafuino L light up. Once they stop blinking and you see "Upload Successful" in the Arduino IDE, you should see the LED marked L start blinking.